One major concern with the Scout II axle swap is the transfer case.
The Scout II uses a passenger drop transfer case, so the front
differential is on the passenger side. All the Wranglers use a
drivers drop transfer case, so the solution is to use a Dana 300
from a 80s CJ. This also means that the exhaust needs to be
rerouted around to the other side. There are also other details
to the swap, some of the details are related to doing a spring
over axle conversion.
Transfer Case
After removing the crossmember/skidplate and NP231 transfer case,
I temporarily bolted the D300 to the automatic tranny. It fit
perfectly although the front output end of the case hung down
quite a bit. Not much I could do there. Re-indexing the way
the case mounted to the tranny was not an option.
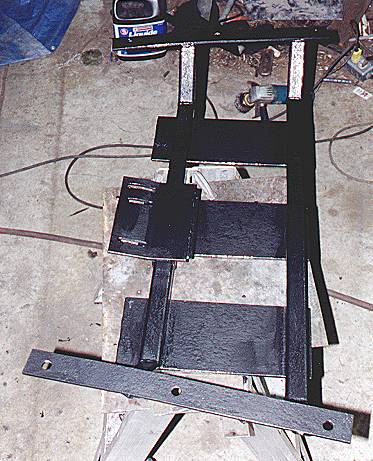
 With the case in place, I was able to take measurements
which I needed to fabricate a new crossmember/skidplate out
of square tubing. In retrospect, I think it would be easier
and save space if I just hacked up a stock
crossmember/skidplate. I'll probably do that later this
year.
With the case in place, I was able to take measurements
which I needed to fabricate a new crossmember/skidplate out
of square tubing. In retrospect, I think it would be easier
and save space if I just hacked up a stock
crossmember/skidplate. I'll probably do that later this
year.
I also marked out which part of the floor pan needed
to be pounded out in order to make room for the transfer
case shifter. An easy way to do this (thanks to Wil for
this tip) was to jack up the entire vehicle and then lower
it onto a tall jackstand which will then push against the
part of the floor which needs to be pounded up.
While I had the skidplate removed, I cut off the exhaust hanger hoop
which is mounted on the passenger's side of the transmission
mount. I then welded it onto the driver's side of the mount
so it could be re-used when the exhaust gets re-routed.
I used a torch to put the necessary bends in the shifter so
that it crossed over the transmission and came up in the
same place that the factory shifter did. An alternative
method I've heard of is to simply turn the transmission
tunnel cover around so that the shifter plate/boot is on the
passenger-side.
The speedometer cable and breather tube hooked up to the
Dana 300 without problems. Well, that's not quite accurate.
I did manage to break the nut which holds the speedo gear
assembly in the transfer case. It's a cheap, cast metal
part so be very careful when tightening it. Fortunately, I
was able to obtain a replacement the very next day from
Gary's Autowrecking.
I was planning on using a CV driveshaft with 1310 u-joints,
so I installed a yoke on the rear for this drive shaft. I
also changed a couple of seals.
Drive Shafts
I was hoping to use a front CV shaft but there wasn't enough
room for the CV. It would have hit the auto tranny's pan
under easy axle movement. I had to use a regular
two-u-joint driveshaft in the front.
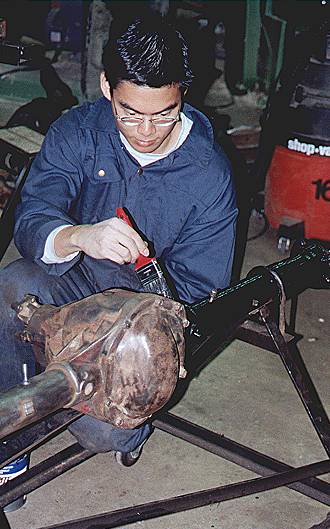
The rear axle installed even more easily than the front. I
used an early Ford Bronco front CV shaft for the rear. It
was short by 1 or 2 inches but would suffice for temporary
street use.
At the driveshaft shop they lengthened, re-furbished & balanced the
Bronco CV shaft I had in the back and re-tubed a skinny '88 YJ front
shaft. Because of its small diameter (but 1/8" wall) and low mass,
I didn't have it balanced and even so, there is absolutely no
vibration when I drive with the hubs locked in.
Springs
With both the front and rear axles, I used a "fresh" set of
used YJ springs. To these spring packs I added a main leaf
(with the eyes cut off) from my old packs. The extra leaf
should help reduce spring wrap with the spring over axle
conversion.
Wheels
By the way, if you haven't already guessed, the Scout axles
use the 5 on 5.5" bolt pattern. This meant that I had to
buy a new set of wheels and swap my tires onto them while I
had the Jeep supported on its frame.
Exhaust
 I cut my original exhuast off from the header back because
it needed to be rerouted straight down the driver side.
I took the back roads to get to the local muffler shop where
they re-routed the exhaust so that it stayed on the driver's
side until it got close to the gas tank where it then bent
up and over the driveshaft and exited in the standard
location.
I cut my original exhuast off from the header back because
it needed to be rerouted straight down the driver side.
I took the back roads to get to the local muffler shop where
they re-routed the exhaust so that it stayed on the driver's
side until it got close to the gas tank where it then bent
up and over the driveshaft and exited in the standard
location.
Brakes
I was planning on using a CJ master cylinder which I heard
works well with this swap but it wouldn't bolt up to my YJ
booster. I decided to fore go this modification and keep my
stock master cylinder and booster. The result was the same
old soft pedal but much better braking performance.
Rob Bryce gave me a list of vehicle brake specs and the late
CJ mcs seem to have the same mc piston size as the YJ mcs.
I think the reason the CJ stuff might have worked better
is because it's possible to adjust the pedal/push rod leverage.
I might try that on my YJ by buying one of those adjustable rods.
Shocks
The long DoetschTech shocks which came with my RE SOA kit
were too long for my new axles which utilized the higher
axle-side shock mounts. I ended up with 3" available
compression in the front and 2" in the back. I was actually
bottoming out my shocks on mild street bumps. I solved this
problem by moving the rear DoetschTechs to the front and
putting a pair of cheap ($20 each) Canadian Tire MotoMaster
shocks in the rear. These cheap shocks were discards from
my friend's FJ45 Land Cruiser which he had just converted to
SOA. I was able to move the rear shocks to the front because
my Rubicon Express spring over conversion kit changed the
front shocks to eyes on top and bottom.
Conclusion
It sure is nice to have free-wheeling
hubs again. I can finally run 33" tires and lockers
without worrying about snapping axle shafts.
This project was a lot more work than I anticipated and this
short write-up doesn't do justice to the long hours
involved. On the other hand, a more organized person could
do this faster and better than I did.
I would strongly
recommend having a schedule and setting intermittent goals
to keep the project moving along without getting yourself
stressed out. I could have saved money by thinking
long-term and determining all the pieces I would need. The
sooner you know this, the more opportunity you have to find
these parts in salvage yards or through private sales.
I expected the short shocks to lower my articulation but
when I ramped it 5 days later, it scored a 1052 RTI. Not
bad at all! This was the first time I had ever ramped my
Jeep so I can't compare it to my older SOA performance. But
that's not the point. The point is that even with these
shorter shocks, I still have a very respectable amount of
suspension travel.
The ride with the extra full-length leaves was a bit firmer
than the older springs but much more stable. It handled
highway bumps better without ruining the comfortable ride.
It also allowed me to travel much faster offroad, absorbing
large bumps easily.
Moving the lower shock mounts higher made a HUGE difference
offroad. I took my Jeep out for three days of offroading
once I got it back on the road and I only hit my diffs once.
If you do an SOA conversion without moving the shock mounts,
you're missing out on a major advantage of the SOA.
Even though I had setup the front pinion angle for a CV
shaft and the non-CV shaft I ended up using was not
balanced, I've detected no vibration even at speeds up to
100 km/h. I think a lot of that might have to do with the
fact that the front shaft is one of the skinny ones used in
pre-1990 YJs.
The bigger brakes on the Scout axles are great. While my
brake pedal still feels too soft for my liking, the brakes
grab much better and can lock up my wheels without too much
effort. Since my Jeep is my daily commuter vehicle,
it's no wonder that I appreciate the bigger brakes
more than any of the other advantages gained with the
axle swap.
The 3.55 gears which these axles came with were an
improvement over the 3.07 ratio in my D30/D35 axles.
However, it's not a huge improvement. I'd still like
to have 4.11 gears with my 33" tires.
Still To Do
I still have to re-route the vent lines to the axle breather
tubes. I found an NPT fitting that I could screw into the
front D44 but the rear had a very coarse thread. I may have
to drill a new hole back there and thread it to NPT specs.
To prevent the dreaded axle-wrap problem, I have to build
some kind of anti-wrap bar. I'll probably make one which
mounts firmly to the axle housing and is shackled to the
xfer case crossmember.
Bronco or Scout II?
After seeing
Chris Waterman's Early Ford Bronco axle swap, I think that
would be the route I'd strongly consider it for future
YJ axle upgrades. It requires less work and is much
less intimidating than the Scout axle swap. However,
I can take solace in the following benefits over the
EB axle swap:
- Scout front D44s come with disc brakes and large
u-joints.
- The Scout front D44 allows a slightly sharper
turning radius.
- Rear D44 uses 30-spline axle shafts vs. the
Bronco's 28-spline units.
- Rear D44 has a higher pinion, requiring a less
severe driveshaft angle.
I'd be hard pressed to say which swap has the overall
performance advantage. The point to keep in mind,
though, is that there are at least two relatively easy
and affordable ways to turn a Jeep YJ into a extremely
reliable offroad machine, able to compete head-to-head
with the best.
Thanks
I wouldn't have been able to do this swap without help
from a lot of people. In particular, I'd like to
thank:
John Barron
Louie Belt
Rick Boiros
Rob Bryce
John Edgar
Wayne Foster
Wil Girindra
Ron Gooch
Phil Gough
Herbert Leung
Grant Klavatalks
Ed Mah
John Nutter
Vern O'Connor
Brad Peden
Steve Prinz
Richard Reimer
Chris Waterman
Jim Weed
Paul Weitlauf
Alan Wicker
Jonathan Yim