Over the years there has been much written about shortening axle
housings, but it has been rare to ever see anything written by a
shade tree mechanic (or is that a Shade Tree Howler Monkey?). No one
has ever written a guide to help you do it yourself (at least not
that I know of). Because of this I wasn't sure I'd be able to do the
job myself. Among the rumors I had heard were that I would need a 50
ton press to get the old tubing out of the knuckle, I would never
get the geometry right, and the old standard of "Do you really think
you can do something yourself that shops need ten of thousands of
dollars worth of equipment to do?". Here's what I did and how I did
it.
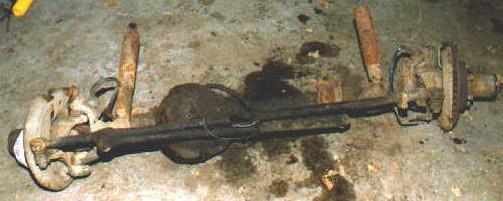
I started with an axle housing from a narrow track '78 Cherokee and
knowledge I gained from the Jeep tech list and members of my club.
I lucked into getting the complete front end for $40, so I wasn't
too worried about ruining it.
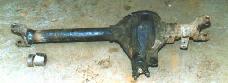
The first thing I did was to set the Dana 44 in front of my Jeep and
start measuring. The spring pads were about 32 inches apart, 4 inches
wider than my CJ. The overall length was around 61 inches from wheel
mounting surface to wheel mounting surface and my CJ widetrack front
end was 56 inches. The distance from the spring pads to the wheel
mounting surface was pretty close to my CJ, so I reasoned that I
could leave the short side alone and shorten the long side about
4 inches. This agreed with everything I had read on Jeep-tech, so
I decided to go ahead with it.
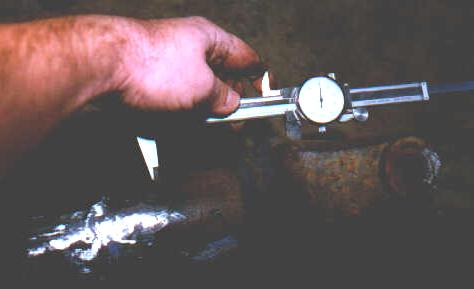
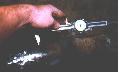
I also checked caster and pinion angles. My CJ had about 0 degrees of
caster, the spring pads were parallel with the floor and the pinion
was about 5 degrees up relative to the floor. This isn't the standard
way of measuring pinion angle, I was just trying to measure the
relative angle between the spring pads and pinion angle so I could
duplicate it on the new front end. Then I measured it out on the
Dana 44 front end. With the spring pads parallel to the floor the
pinion was 12 degrees up and caster was at 0 degrees. This is a
very good thing, it meant I could cut 7 degrees out of the cast
in spring pad on the housing, the other spring pad has to be moved
anyways. The end result would be a pinion angle of 5 degrees up
(relative to the floor) and 7 degrees of caster without cutting
and turning the inner knuckle on the short side.

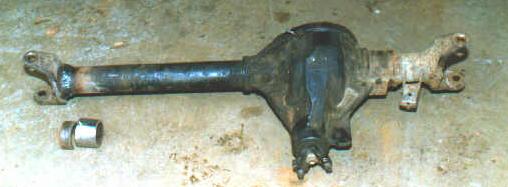
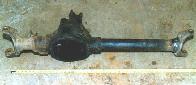
The first step was to remove the brakes, rotors, spindles and outer
knuckles, shafts, and differential carrier. This is all well documented
elsewhere, so I won't go into detail here. I stripped it down to the
bare housing except I left the pinion in (no reason, I just didn't
feel like removing it). Next I used a 4" grinder to remove the spring
perch and shock mount from the long axle tube. I gouged the tube a
bit in doing this so I welded up the gouges and ground them smooth
again.
Next I re-cut the spring perch that is cast into the center section to
give me the proper pinion angle. I had to take off more than 1/4" of
metal at one end and taper down to none removed at the other. I
started by setting the axle on jackstands with a third jack stand
under the pinion. I carefully adjusted and shimmed the jackstand
under the pinion until I had the housing positioned just right.
I set it up so that the final pad angle would be correct if I held
the grinder level. I installed a new wheel on the grinder and
started at the thick end. I pushed the grinder across using the edge
to cut away the metal, stopping to check the angle several time.
Eventually I was finished. The spring pad looks great and is perfectly
flat. I am very pleased with the results, although it did take a long
time and I went through 3 grinding wheels.
 The next step was the actual cutting of the tube. I brought the housing
down to my friend Tim Norstad's house because he has a chop saw and is
always generous with his tools. I had already measured and marked the
tubing at home. This is not difficult, just remember that the tube
sticks into the inner knuckle a bit, so don't cut the tubing off
at 4" away from the knuckle. I'm not going to give an actual
measurement here because I'm not positive everyone's axle housing
will be identical to mine. I purposely cut my tubing about 1/8"
short in case I decided to weld where the end of the tube meets the
knuckle. The tubing wasn't any more difficult to cut than any other
piece of metal that size. After the tube was cut to size I had a
short piece of tube still attached to the inner knuckle. Tim and I
cut that tube off as close to the knuckle as possible.
The next step was the actual cutting of the tube. I brought the housing
down to my friend Tim Norstad's house because he has a chop saw and is
always generous with his tools. I had already measured and marked the
tubing at home. This is not difficult, just remember that the tube
sticks into the inner knuckle a bit, so don't cut the tubing off
at 4" away from the knuckle. I'm not going to give an actual
measurement here because I'm not positive everyone's axle housing
will be identical to mine. I purposely cut my tubing about 1/8"
short in case I decided to weld where the end of the tube meets the
knuckle. The tubing wasn't any more difficult to cut than any other
piece of metal that size. After the tube was cut to size I had a
short piece of tube still attached to the inner knuckle. Tim and I
cut that tube off as close to the knuckle as possible.
When I got home I clamped the inner knuckle in my vice and started
grinding off the bead and old tube where it attached to the knuckle.
The guys in my club said to grind until I just started to see a line
or crack between the tube and the knuckle. Their next suggestion was
to press out the old tube with a hydraulic press. I don't have a
press so I tried hammering it with a 3 lb hammer and punch. This did
nothing. Then I put the knuckle back in the vice, took my hacksaw
apart and put the blade through the center and reconnected it. I
made 2 cuts about 90 degrees apart and then easily drove out the
pieces of tubing one at a time.
This left me with a free outer knuckle and a tube it needed to go on.
I had heard that I would definitely need a press for this part but I
had done it all myself so far, I wasn't going to stop here without
at least trying. I cleaned the rust and weld splatter off the tube
and ground a small bevel all the way around the edge. Next I started
tapping the knuckle on with a 1 lb ball peen hammer. It was working.
I had to hit it hard, but not so hard I was worried about bending
breaking anything.
After the outer knuckle was on 1/2" I stopped and set the caster. To
do this I set the housing up on jackstands again, this time I set it
so that the surface for the nut of the lower ball joint on the still
attached knuckle was level. Then I tapped the free knuckle until it
matched. From here I drove it on the rest of the way, stopping may
times to measure. After I had it in place I spent 2 hours with a tape
measure and angle finder making sure everything was right. I tack
welded it and let it sit for a week before I spent another hour
measuring again.
The only thing left was to weld the knuckle on. If you aren't sure
about your welding skills or your welder doesn't have a high enough
amp rating it would be best to leave it to a professional welder. One
important note is that the weld doesn't actually carry the weight of
the vehicle because the tubing sticks into the inner knuckle about an
inch. I have heard of people butt welding the knuckle to the tube
(they didn't remove the old tube from the knuckle, just cut it flush
and rewelded) but this sounds incredibly weak and dangerous to me,
not to mention the difficulty of lining up the pieces. The fact that
the tube is so far into the knuckle and such a tight fit in the
knuckle gives me the confidence to know it is strong and lined up
properly.
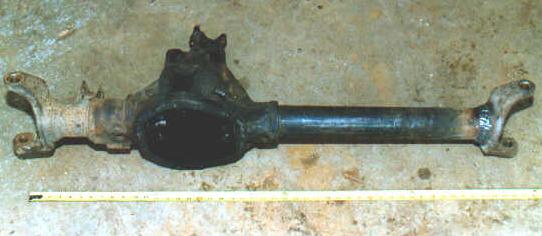
I re-installed the outer knuckles, spindles, and rotors to check out
the front end. The actual distance from wheel mounting surface to
wheel mounting surface is 57 inches. My wheels will stick out 1/2"
farther than they did before. All the angles check out right and
it looks like it should bolt in with no problems.
What's left? I need to send the long side inner axle shaft in to be
shortened, I need to weld the spring pad and shock mount for the long
side back on, I need new ball joints and U-joints and I need to decide
about the steering and brakes.
There are many steering and brake options available to me by mixing and
matching Jeep, Chevy, Ford and Scout II disc brake parts, so this won't
be a problem. My current thought is to use the Cherokee outer knuckles,
spindles and Chevy type brakes with F-150 rotors (F-150's have the same
5 on 5 1/2" wheel bolt pattern as Jeep CJ's). There are two advantages
to this: 1) I will get the stronger and less leaky internal type
lockouts and 2) The Cherokee tie rod mounts on top of the knuckles and
is much larger and stronger than a CJ tie rod.
Another possibility is using my stock outer knuckles, spindles, brakes
and steering with Scout II outer axle shafts. Scout II outer axle
shafts use the Dana 44 sized U-joint but are otherwise similar to CJ
outer shafts. Or I could use non disc brake CJ outer knuckles with
my stock steering, Cherokee spindles, Chevy type brakes and F-150
rotors and hubs or I could... The possibilities are limitless.
Contributors
I'd like to thank Paul Weitlauf, Rick Boiros, Larry Soo and everyone
else on the Jeep-tech list who contributed to those threads, and the
guys in my club The Stone
Bros who had done this job before and were just waiting for
someone to ask how to do it.